 Getting started
|
|
|
|
Video tutorial
Quick steps
System requirements
Review the system requirements for the agent and configuration dashboard to check if your system is compatible or if you need to upgrade.
Sign in to AP Newsroom
-
At https://newsroom.ap.org/, enter your AP Newsroom user name and password, and then click Sign In.
-
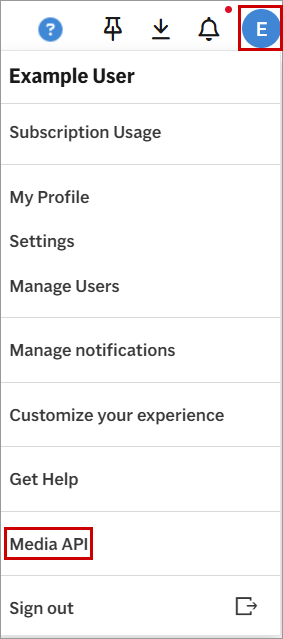
Click the Account icon at top right and then select Media API from the menu:

Create a content profile
-
On the dashboard, click Create Content Profile, and then click New Profile.
-
On the Create Content Profile page, type the name of the profile in the Profile Name box.
-
On the Select Content tab, select the check box next to each entitlement that you want to download. For more information, see Selecting content entitlements.
-
On the Content Options tab, select the file types and formats for downloading content; for example, you can choose to download specific video renditions or NITF-formatted stories. For more information, see Content file types and formats.
-
On the Content Save Options tab, you can customize the directory for saving content, folder structure, file naming format and duplicate settings. For more information, see Content save options.
|
|
|
|
The settings that you specify on the Content Options and Content Save Options tabs are the default settings for downloading content for all entitlements. You can customize these settings for each entitlement by clicking Edit Settings on the Select Content tab. For more information, see Customizing entitlement settings. |
|
|
|
|
-
Click Save at the bottom of the page to save your profile.
Get API key
On the dashboard, click See My API Keys (you may need to confirm your password to display your API key).
Download and register the agent
-
On the dashboard, click Download Agent and save the agent jar file to a folder on your machine.
|
|
|
|
|
|
|
|
-
Do one of the following to run the agent:
-
Option 1: Command line
-
Open an elevated/admin command prompt on Windows or use sudo on Mac or Linux.
-
Change to the directory where the agent jar file is located; for example, on Windows:
cd LOCATION_OF_AGENT -
Run the following command to register and run your agent:
java -Xms512M -Xmx1G -jar agent.jar key:API_KEY
-
-
Option 2: Double-clicking the agent jar file
-
Make sure you have Oracle Java installed, and you are logged in as admin/root.
-
From your desktop environment, browse to the folder where you saved the agent jar file and double-click the file name. The Register Agent page opens in your browser prompting you for an API key.
-
To register your agent with the portal, enter your API key in the API Key box and click Register. If registration is successful, you will receive this message: "Success you've verified your API Key".
-
-
|
|
|
|
Check your browser's Address box to determine where the Agent Management page is located on your local machine. For example, if your agent registration address is localhost:8087/register, you can manage your agent from your local machine at localhost:8087/agent. |
|
|
|
|
-
Click Go to Admin Portal to assign a content profile to your agent.
Assign the profile to the agent
-
On the Manage Ingest Agent page, enter the agent name of your choice in the Agent Name box. The agent name allows you to identify this agent on the configuration dashboard and must be unique.
-
Select your content profile from the Content Profile list.
-
If you are using monitoring and notifications for your agent, select your monitor from the Assigned Monitor menu.
-
Make sure that the default access mode is selected from the Access Mode list.
-
Click Save Agent.
Start ingesting content
On the Manage Ingest Agent page, click Start Ingestion.
